Using SSH certificates — (SSH Recipes in Go) — An interlude
So in our earlier blog post we saw how we could use Go’s SSH library to remote control your server. Before we go on to part 2 of the series, I wanted to talk about SSH auth briefly and on setting up a scalable approach to SSH identities.
When you set a linux server up, you will add a few known keys to authorized_keys. This is fine when your team is small. As your team grows or you bring in consultants or there is churn in your team, it quickly becomes quite difficult to keep up with the authorized_keys. The trouble here is that there is no expiration of trust. Once added you trust the SSH key implicitly forever and this is breaking one of the cardinal rules of security.
Imagine, you hired a consultant and you would like for him to access your web servers for a week’s time but you would not want him to SSH to your database servers. Such fine grained access control is difficult to manage once you cross a few 10s of servers mark.
Also, there is no easy way to churn keys as the public key is often derived from the private key. Imagine if a private key is leaked and you would like to identify and revoke these keys, it quickly escalates from being a bit of a hassle to hiring somebody to manage access full time. Fortunately there is a better way.
SSH allows you to authenticate with signed certificates against a Certificate Authority. You can use the familiar ssh-keygen command to create the CA. Setup SSH server to trust the CA, sign the user public key and use it to access the server.
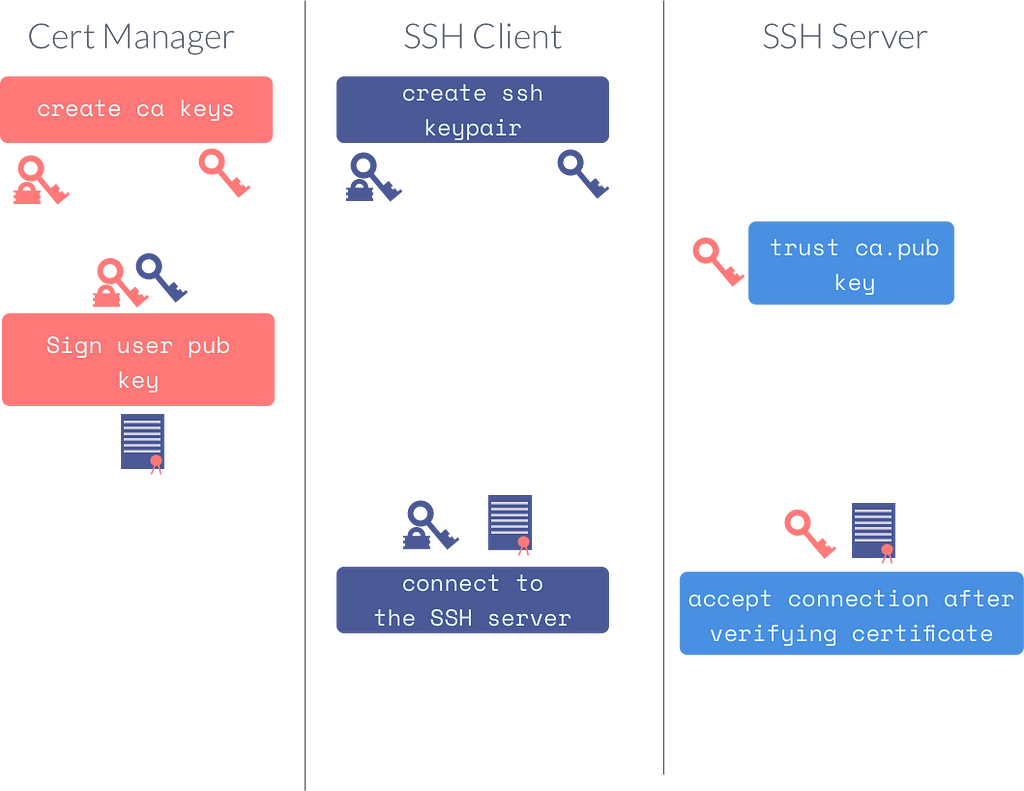
SSH Certificate workflow
Let us break it down step by step.
$ ssh-keygen -q -N ” -C ca -f ca
Now this creates a ca and ca.pub keypair. Needless to say you have to guard the private ca key as best as you can. On your SSH server, you have to set the TrustedUserCAKeys directive to point to this ca.pub file.
Now imagine you have a user called deploy on the server and you would like to authorize somebody to login as the deploy user for the next week. Lets first create a SSH keypair.
$ ssh-keygen -t ecdsa -N ” -f mykey
Now that I have mykey and mykey.pub, I can sign mykey.pub with the CA’s private key.
$ ssh-keygen -s ca -I vagmi -n deploy -V +1w -z 1 mykey.pub
This now creates a file called mykey-cert.pub. Notice that i only need to shop the user’s public key to the machine holding the CA private key to generate a certifcate. This certificate is public information and can be distributed by email or made available as a download. The private key does not leave the system it was generated on. Also notice that I used the -n flag (Principal name) to match the Linux user.
We can inspect the certificates contents like so.
$ ssh-keygen -L -f mykey-cert.pub
mykey-cert.pub:
Type: ecdsa-sha2-nistp256-cert-v01@openssh.com user certificate
Public key: ECDSA-CERT SHA256:djOoUNuEA3NjRmVPNcmBmvB63ZgKLAwz6LJ4rXPLWSA
Signing CA: RSA SHA256:65hSbheLh4ktUrQQTadlBi5x+V26U8HcTAWDOcjR2Ck
Key ID: “vagmi”
Serial: 1
Valid: from 2018-12-15T17:37:00 to 2018-12-22T17:38:11
Principals:
deploy
Critical Options: (none)
Extensions:
permit-X11-forwarding
permit-agent-forwarding
permit-port-forwarding
permit-pty
permit-user-rc
This shows the certificate validity, identity, principals and the serial number. Now, we can connect to the SSH server using both the certificate and the private key.
ssh -i path/to/mykey -i path/to/mykey-cert.pub deploy@server
And the SSH auth log will have something looking like this.
Accepted publickey for deploy from xx.xx.xx.xx port xxxx ssh2: ECDSA-CERT ID vagmi (serial 1) CA ECDSA fingerprint…
SSH certificates also allows you to deal with auth principals and KRL (Key Revocation List) files. I have created a simple demo using docker to create an CA, setup an SSH server and connect using a certificate using SSH client.
You can find the code on https://github.com/tarkalabs/ssh-signer.